This guide explains how to use the WHM panel to enable/disable AutoSSL for specific users.
WHM admins can offer free SSL certificates to cPanel server users (Powered by Sectigo). The users need to use the WHM interface to enable or disable AutoSSL. After every 3 months, a free cPanel SSL certificate is routinely produced for the user’s domain through the AutoSSL cPanel tool. Moreover, it examines the installed AutoSSL certificates and replacements that are about to expire. Furthermore, the application checks the security level of these certificates, and if they do not offer a minimum level of security, it discards them.
Follow the steps to enable/disable AutoSSL:
- Log in to WHM.
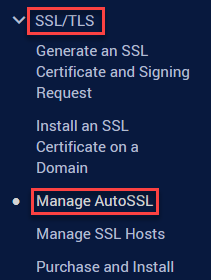
- Click on the “Manage AutoSSL” sub-option under the “SSL/TLS” option.
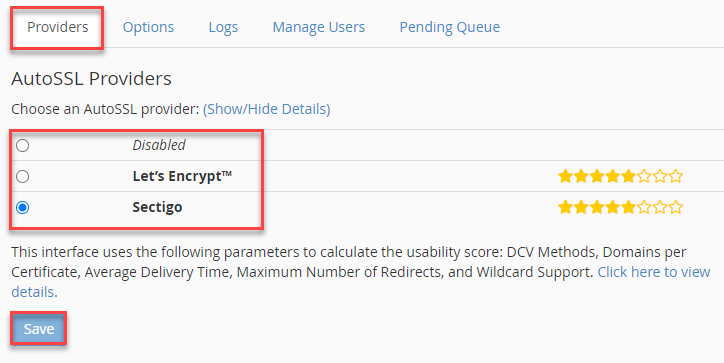
- The “Manage AutoSSL” screen will open up. The utility’s many administration tools and choices are displayed here.

- You will find the “AutoSSL Providers” option. To disable or select AutoSSL Provider, click Disabled or cPanel (powered by Sectigo).
- Click on the “Save” button.
Now, let us follow the steps to enable/disable a specific user:
- Select the “Manage Users” tab.
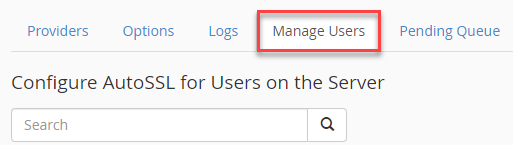
- It includes the AutoSSL configuration settings for each user account on your server.
- Select the desired user account and then select the AutoSSL setting.
- You have three options available:
a) Enable AutoSSL
b) Disable AutoSSL
c) Reset to Feature List Setting

- Make a note of one thing, the AutoSSL disabled will not get any free SSL certificate from cPanel.
In this manner, you can enable/disable AutoSSL for specific users. For further information do visit our KB section regularly.
