In this article, we will explain to you how to add the rules to the disabled list in Imunify360. You can disable/re-enable specific WAF/ossec rules on the Disabled Rules tab. This can be done for any or all of the domains on a server. Some rules have N/A in the Domains column because they do not support per-domain disabling.
To add rules to the disabled list in Imunify360:
- Log in to WHM.

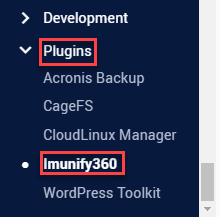
- Select the “Plugins” option and click on the “Imunify360” sub-option under that.
- Click on the settings icon on the right-hand side of the screen.

- Select the “Disabled Rules” option.

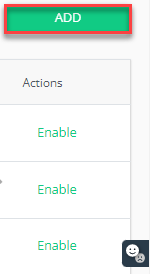
- On the right side you will find an “Add” button. Click on it.
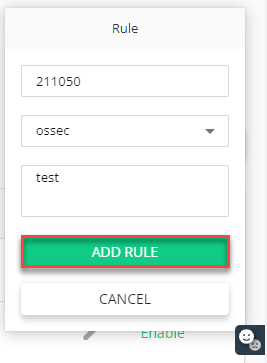
- After clicking on it, a small window will open up.
- Fill in the information:
a) Rule ID: Enter the rule ID.
b) From the drop-down menu, select the firewall plugin (ossec for OSSEC, modsec for ModSecurity).
c) Description: Enter the description.
d) Domains- The only firewall plugin that supports this option is modsec. Enter a list of domains, separated by commas, for which this rule should be disabled. To disable across all domains, leave blank. - Click on the “ADD RULE” button.
- This rule will be added to the disabled rule list and you will get a success message as shown below.

What do you think of our article? We are confident you will appreciate our assistance if you like our article.
After managing rules, ensure data safety by learning How to Enable the Backup Feature Using the Imunify360 Plugin in WHM.
Visit our KB section regularly for the latest updates and informational KBs. Don’t hesitate to reach out to our support team if you are experiencing difficulty.