
Enhance lets you manage mailboxes, email authentication and website databases from the control panel. This guide explains how to create these accounts and check the settings they depend on.
Managing email accounts
- Open Websites and select the website.
- Open Emails and click Add account. Some interfaces also provide Email directly in the sidebar.
- Enter the email address and select Mailbox if it should store messages. A forwarder-only address forwards mail without storing it or providing a normal mailbox login.
- Set a strong password and complete the available mailbox settings within your plan’s limits.
- Click Add and check the new address in the account list.
- Test sending and receiving mail. Incoming delivery also depends on the domain’s MX records pointing to the intended mail service.

Email authentication
SPF identifies the servers allowed to send mail for a domain. DKIM adds a signature that receiving servers can check against a public key published in DNS. These records help receivers check messages; they do not guarantee that every message will be accepted.
Enhance can create authentication records in DNS zones it manages. If DNS is hosted elsewhere, publish the required records at that provider instead.
Enable DKIM
- Open Websites and select the website.
- Open Domains and select the domain.
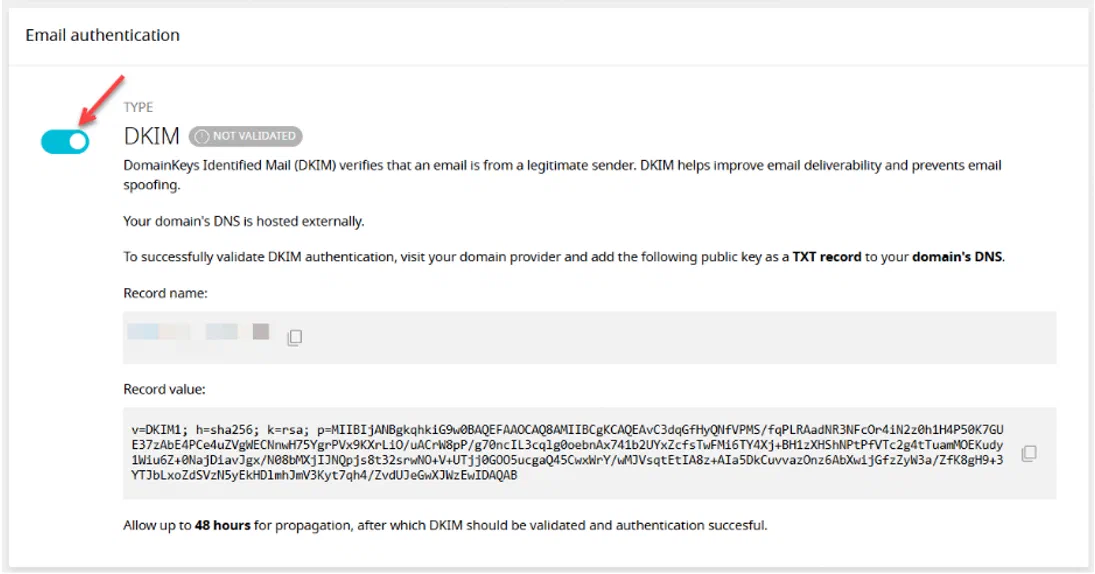
- Find Email authentication and switch DKIM on.
- If Enhance manages the authoritative DNS, wait for validation. If another provider manages it, add the record shown by Enhance at that provider.
- Check that validation succeeds and test a message to an external mailbox.
Review the domain’s SPF record as well, especially if other services send mail for it. Combine authorised senders into one SPF policy rather than adding multiple SPF records.
Catch-all email addresses
A catch-all receives mail sent to addresses on a domain that do not have their own configured destination. Mail for an existing address still follows that address’s settings. Only one catch-all destination can be configured per domain.
A catch-all also accepts messages sent to guessed or misspelt addresses and can attract more unwanted mail. Create specific addresses or aliases instead when they cover your needs.
Create a catch-all
- Open the website’s Emails page and click Add account.
- Enter the address and complete the mailbox settings.
- Select Make this email address a catch-all.
- Click Add or Save, as displayed, and test delivery to an unused address on the domain.
Use an existing mailbox
- Find the address under Emails and open Manage.
- Find Catch-all and switch it on.
- Save if prompted, then test delivery to an unused address.

Managing databases in Enhance
Add a database
- Open Websites, select the website and open Databases.
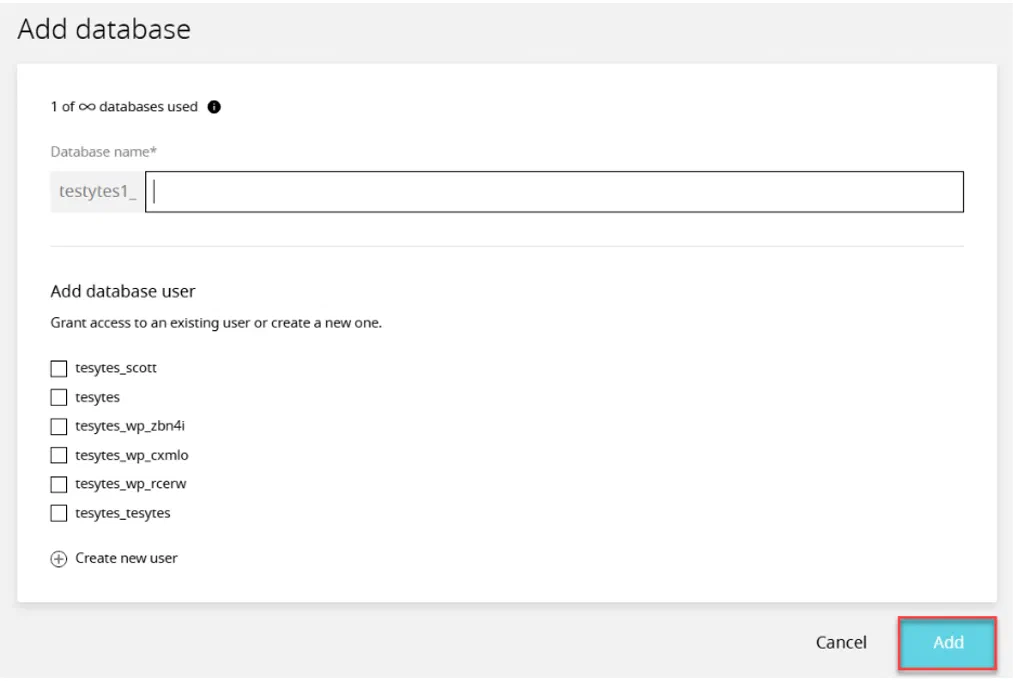
- Click Add database and enter a name.
- Create a database user with a strong password or select an existing user.
- Review the database access and available privileges. For MySQL or MariaDB, select the permissions required by the application rather than automatically granting broader access.
- Click Add and record the full database name and connection details for the application’s configuration.
Add a database user
- On the website’s Databases page, click Add user.
- Enter the username and a strong password.
- Select the database the user should access and review the available permissions.
- Click Add.
A database without an assigned user cannot be accessed by an application using that user’s credentials. Creating a user alone does not automatically grant access to every database.
Accessing phpMyAdmin
- Open the website’s Databases page.
- Find the MySQL or MariaDB database, open its menu and select Manage.
- Find the phpMyAdmin section and click its button.
- Confirm that the expected database is selected before making changes.

Back up the database before changing or deleting data. phpMyAdmin is for MySQL and MariaDB, not PostgreSQL databases.