File permissions enable operating systems to understand how requests to access files should be handled.
There are three levels of file permission, read, write and execute. Read permission allows to read the file, Write permission enables to modify the file and Execute permission allows to execute the file.
Read, write, or execute requests come from the user as well as from other programs and files that need to access the file.
To provide more control, access requesters are divided into three separate categories, allowing you to read, write, and execute independently for each one. These categories are user, group and world. User permissions control what the file’s owner can do, Group permissions control what other files and programs in the folder can do and World permissions control the access of everyone else.
In this tutorial, we’ll explain how to change file permissions in cPanel
A web server, for example, needs to read the pages of a website so that it can display them in the user’s browser.
For your website to work properly, the following permissions must be set –
- Your website’s HTML files and images must be user-writable and readable by others. These permissions are set automatically when a file is uploaded or installed.
- Your folder must be executable by others. Default permissions are also automatically set to allow this. These use the value 755 which means the files are readable and executable by user, group and world, but writable only by the user (owner).
- One set of files for which permissions are not automatically set are CGI files (that is, those files in the cgi-bin folder). This also needs to be executed by others and requires the same 755 value settings as the point above. However, since permissions are not set automatically, you may need to change them manually after uploading the file.
Changing file permissions in cPanel
To change file permissions in cPanel, follow these steps:
- Log in to cPanel Account
- Under the Files section and click on the File Manager icon.
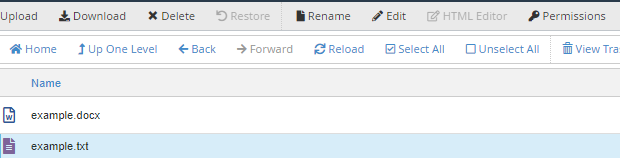
- In File Manager, locate the folder or file whose permission you wish to change.

- Next, select the file or folder you want to change by clicking its name. Once it is highlighted in blue, click the Permissions button (with the key icon) in File Manager’s top menu.
- A dialog box will then open where you can view the permissions that exist for that file or folder.
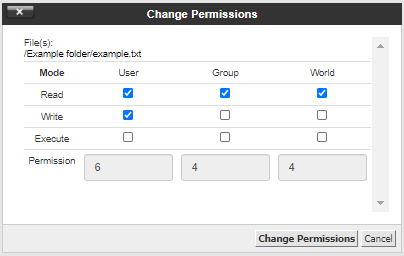
- The three categories, User, Group and World, are displayed across the top and their Read, Write and Execute permissions are in the columns underneath. A highlighted checkbox indicates that permission has been granted.
- To change permissions, check or uncheck the required boxes. When you do this, the permission value numbers at the bottom will automatically update.
- After you make your changes, click the Change Permissions button to save the new permission settings.
Note that if permissions are changed incorrectly, it may affect the performance of your website. To minimize risk and ensure data security, we always recommend our customers to back up the website. So you can easily restore your website if anything happens.