Email spoofing and phishing are some of the most common cybersecurity threats. To safeguard your domain, you can set up DMARC (Domain-based Message Authentication, Reporting & Conformance) records.
DMARC works with SPF and DKIM to verify whether emails sent from your domain are legitimate. Configuring it in cPanel strengthens your domain reputation and helps ensure your messages reach inboxes instead of spam folders.
Understanding DMARC Record Fields
A DMARC record is added as a TXT record in your domain’s DNS zone. Below is an explanation of each field commonly used in a DMARC record.
Name
- _dmarc
- Classifies the record as a DMARC policy for your domain.
- The full record applies to yourdomain.com.
TTL (Time To Live)
- Example: 14400
- Defines how long DNS resolvers should cache the DMARC record before refreshing it.
- A lower TTL allows quicker updates; a higher TTL reduces DNS queries.
Type
- TXT
- DMARC records must always be created as TXT records.
DMARC Policy Parameters Explained
v (Version)
- v=DMARC1
- Specifies the DMARC version.
- This value is mandatory for all DMARC records.
p (Policy)
Defines how recipient servers should handle emails that fail SPF or DKIM checks.
- p=none – No action is taken; emails are delivered normally (monitoring mode).
- p=quarantine – Failed emails are sent to the spam/junk folder.
- p=reject – Failed emails are rejected outright.
sp (Subdomain Policy)
- sp=none
- Controls how DMARC applies to subdomains.
- If not specified, subdomains inherit the main policy.
rf (Report Format)
- rf=afrf
- Defines the format used for DMARC forensic reports.
- afrf is the standard and most commonly used format.
pct (Percentage)
- pct=100
- Specifies the percentage of emails the DMARC policy applies to.
- Useful for gradually enforcing DMARC (e.g., pct=50).
ri (Reporting Interval)
- ri=86400
- Sets how often aggregate DMARC reports are sent, in seconds.
- 86400 equals once every 24 hours.
ruf (Forensic Report Email Address)
- Example: ruf=mailto:[email protected]
- Specifies where forensic (failure) reports should be sent.
- Optional, but useful for detailed monitoring of failed authentications.
This tutorial will guide you through the process step by step:
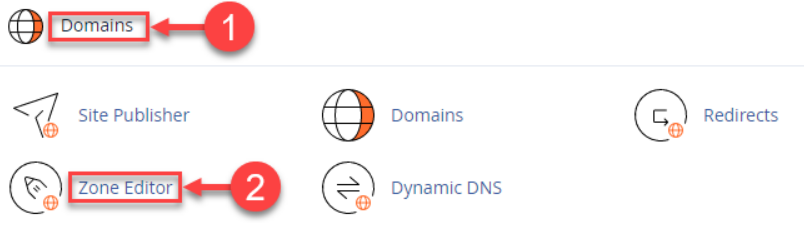
- Log in to cPanel.
- Select the “Zone Editor” option from the “Domains” category.
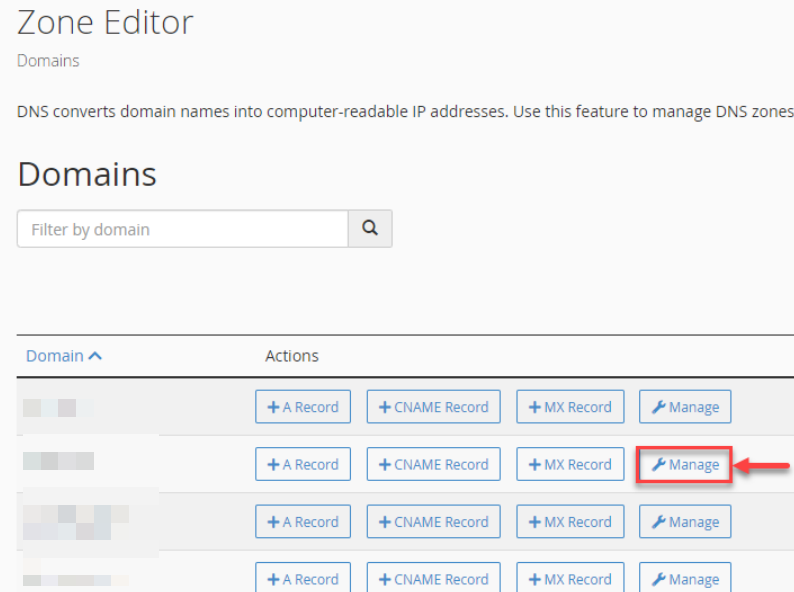
- You will enter a new page. Select the domain and click on the “Manage” button.
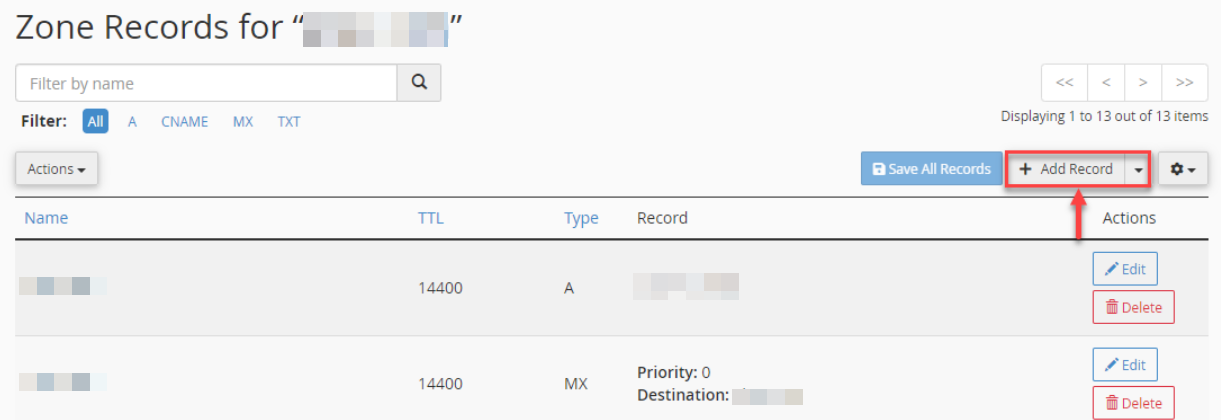
- You will enter the zone records for that domain.
- Click on the “+Add Record” on the top right side of the screen.
- Fill in the table as discussed below:
- Enter the Name- “_dmarc” (The domain will auto-populate if you type “_dmarc.”)
- TTL- 14400
- Type- TXT
- Record –
You must specify here how recipient servers should respond to emails from your domain that do not pass SPF/DKIM validation. Find the options below:
None: v=DMARC1; p=none; sp=none; rf=afrf; pct=100; ri=86400
Reject: v=DMARC1; p=reject; sp=none; rf=afrf; pct=100; ri=86400
Quarantine: v=DMARC1; p=quarantine; sp=none; rf=afrf; pct=100; ri=86400
You can also appeal an email report of unsuccessful DMARC validations by adding an effective email address, as given below:
None: v=DMARC1; p=none; sp=none; ruf=mailto:[email protected]; rf=afrf; pct=100; ri=86400
Reject: v=DMARC1; p=reject; sp=none; rf=afrf; pct=100; ruf=mailto:[email protected]; ri=86400
Quarantine: v=DMARC1; p=quarantine; sp=none; ruf=mailto:[email protected]; rf=afrf; pct=100; ri=86400
- Click on the “Save record” button once you fill in the information.

- You will get a success message as shown below.

- Your record will be added to the Zone records section.
You can set up DMARC records in cPanel in this manner to validate emails. Was it simple?
For more details on adding SPF, DKIM, and DMARC records in another control panel, you can also check this guide: How to Add SPF, DKIM, and DMARC Records to the Plesk Control Panel.